
Welcome to CA Office Automation's Tally Integration Module.
In this video, we will learn how to seamlessly integrate CA Office Automation with Tally and synchronize Proforma Invoices, Invoices, and Receipts between both systems.
This integration eliminates duplicate data entry, reduces accounting errors, improves efficiency, and ensures that both CAOA and Tally remain synchronized at all times.
The Tally Integration module consists of:
• Tally Configuration
• Proforma Invoice Integration
• Invoice Integration
• Receipt Integration
• Proforma Sync from Tally
• Invoice Sync from Tally
• Receipt Sync from Tally
• Tally Sync Report
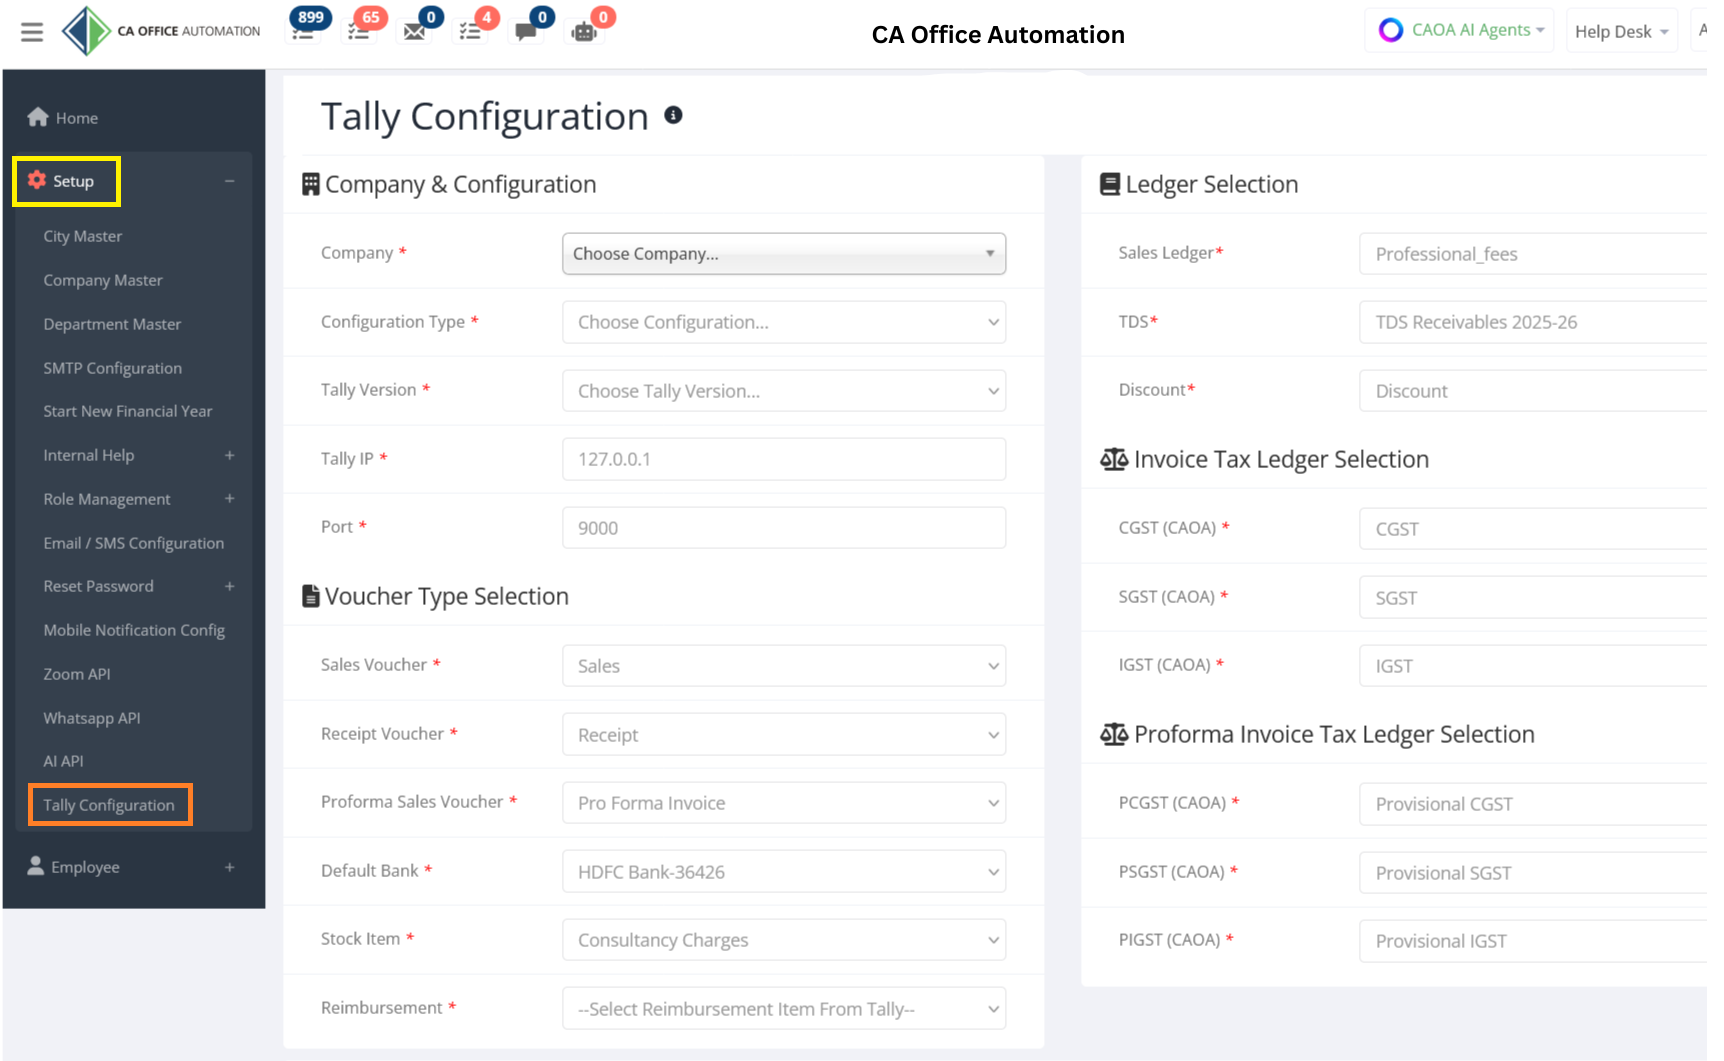
Let us begin with the one-time configuration.
Part 1 – One-Time Tally Configuration
Navigate to:
Setup → Tally Configuration
Before using any Push or Sync functionality, configuration must be completed company-wise.
Please ensure:
• Tally is running on your system.
• The required Tally company is already open.
• You have appropriate access rights in both Tally and CAOA.
Now select the company for which you want to configure Tally integration.
Remember, every company requires its own configuration.
Enter the Tally connection details.
For local installations:
Tally IP = 127.0.0.1
Port = 9000
Next, map the ledgers and voucher types.
Select:
• Sales Ledger
• TDS Ledger
• Discount Ledger
• Default Bank Ledger
Configure Invoice Voucher Types:
• Sales Voucher
• Receipt Voucher
• Proforma Voucher
Map all tax ledgers:
• CGST
• SGST
• IGST
Similarly configure:
• PCGST
• PSGST
• PIGST
for Proforma Invoice taxation.
After completing the mapping, click Save.
Your Tally configuration is now complete.
You are now ready to push and sync data between CAOA and Tally.
Part 2 – Creating and Pushing Proforma Invoices to Tally
Navigate to:
Account → Proforma Invoice → New Proforma Invoice
Create a new Proforma Invoice by selecting:
• Company
• Client
• Services
• Amounts
Save the Proforma Invoice.
Once saved, CAOA automatically sends the Proforma Invoice to Tally.
If the process is successful, the Proforma Invoice will be created in Tally under the configured Voucher Type.
If any issue occurs, the system will display an appropriate error message.
Part 3 – Push Existing Proforma Invoice to Tally
Navigate to:
Account → Proforma Invoice → Proforma Invoice List
Here you can view all Proforma Invoices.
Each record contains a Push to Tally button.
Simply click Push to Tally for the selected Proforma Invoice.
The system will immediately send the selected Proforma Invoice to Tally.
Part 4 – Convert Proforma into Invoice
From the Proforma Invoice List, select the Proforma Invoice.
You will find two options:
• Transfer To Invoice
• Transfer To Invoice With Receipt
Let us understand both options.
Transfer To Invoice
Select the Proforma Invoice.
Click Transfer To Invoice.
CAOA will:
• Create an Invoice
• Push the Invoice to Tally
• Automatically cancel the related Proforma in Tally
This ensures both systems remain synchronized.
Transfer To Invoice With Receipt
Select the Proforma Invoice.
Click Transfer To Invoice With Receipt.
A payment window will appear.
Enter:
• Collected Amount
• TDS Amount
• Discount Amount
• Payment Mode
• Bank Ledger (if applicable)
• Payment Type
• Remarks
Click Save.
The system will:
• Create the Invoice
• Create the Receipt
• Push both records to Tally
• Cancel the original Proforma Invoice in Tally
This provides complete accounting automation in a single step.
Part 5 – Creating and Pushing Invoices to Tally
Navigate to:
Account → Invoice → New Invoice
Create the invoice by selecting:
• Company
• Client
• Services
• Tax Details
Save the invoice.
Immediately after saving, CAOA automatically pushes the invoice to Tally.
The following details are transferred:
• Client Name
• Company Name
• Service Narration
• Invoice Amount
• Tax Details
If successful, the invoice will be available in Tally under the configured Sales Voucher.
Part 6 – Push Existing Invoice to Tally
Navigate to:
Account → Invoice → Invoice List
Locate the invoice.
Click Push to Tally.
The selected invoice will be transmitted to Tally.
If synchronization succeeds, the invoice becomes available in Tally immediately.
Part 7 – Creating and Pushing Receipts to Tally
Navigate to:
Account → Payment Receipt → New Receipt
Enter:
• Client Name
• Company Name
• Payment Mode
• Bank Ledger if required
• Amount Received
• TDS
• Discount
• Transaction Reference Number
• Remarks
Click Save.
CAOA automatically creates the Receipt in Tally under the configured Receipt Voucher.
If any validation issue exists, the system will display an error message.
Part 8 – Push Existing Receipt to Tally
Navigate to:
Account → Payment Receipt → Receipt List
Select the receipt.
Click Push to Tally.
The receipt will be sent to Tally instantly.
Upon success, the entry becomes available in Tally.
Part 9 – Fetch Proforma Invoices from Tally
Navigate to:
Account → Tally Accounts → Proforma Sync
Select the Company.
Click Sync From Tally.
CAOA will fetch newly created or updated Proforma Invoices.
The system displays:
• Proforma Number
• Date
• Party Name
• Company
• Tax Details
• Amount
Now assign services to each fetched Proforma Invoice.
Select the required service checkboxes.
Click Save.
The Proforma Invoice will now be available in the CAOA Proforma Invoice List.
Part 10 – Fetch Invoices from Tally
Navigate to:
Account → Tally Accounts → Invoice Sync
Select the Company.
Click Sync From Tally.
CAOA fetches newly created invoices from Tally.
Review the fetched records.
Assign the required services.
Click Save.
The invoices are now available inside the CAOA Invoice List for further processing.
Part 11 – Fetch Receipts from Tally
Navigate to:
Account → Tally Accounts → Receipt Sync
Select the Company.
Click Sync From Tally.
CAOA retrieves all newly created receipt entries from Tally.
Review the details.
Click Save.
The receipts become available within the CAOA Receipt List and are linked to the respective invoices.
Part 12 – Tally Sync Report
Navigate to:
Account → Tally Accounts → Sync List
This report provides a complete audit trail of all synchronization activities.
You can filter records by:
Document Type:
• Proforma
• Invoice
• Receipt
And Sync Direction:
• Push to Tally
• Fetch from Tally
The report displays:
• Document Number
• Date
• Client Name
• Amount
This helps users verify successful synchronization and monitor data movement between CAOA and Tally.
Part 13 – Delete and Cancel Synchronization
CAOA also maintains synchronization when records are deleted.
When a Proforma Invoice is deleted in CAOA:
• The corresponding Proforma Invoice is automatically cancelled in Tally.
When an Invoice is deleted in CAOA:
• The corresponding Invoice is automatically cancelled in Tally.
If any document remains active in Tally, users can manually synchronize it.
Apply the Deleted filter in the Invoice List.
A Cancel Tally button will appear.
Clicking this button will cancel the document directly in Tally and bring both systems back into sync.
With Tally Integration in CA Office Automation, firms can automate accounting operations, eliminate duplicate entries, synchronize financial records in real time, and ensure complete consistency between CAOA and Tally.
For additional assistance, please contact the CA Office Automation support team.